Your app runs on localhost:3000 and someone else needs to see it: a colleague reviewing a branch, a payment provider sending a webhook, your own phone. To share localhost with a public URL, you run a small tunnel client that dials out to a service on the internet. The service gives you an https:// address, and every visit to it comes back down that connection to your port. You don’t open a port on your router and you don’t deploy anything.
Three tools do this well, and if you’re looking for an ngrok alternative, the other two are the usual answers: ngrok, the long-standing default; Cloudflare Tunnel, free and tied to Cloudflare’s network; and Kiri Share, built into the Kiri container runtime. All three start with one command. They differ in what’s free, whether you can use your own domain, and what you can put in front of the link. Below is how a tunnel works, each tool in turn, and what you’re really exposing.
How to expose localhost to the internet: what a tunnel is
Your laptop normally can’t be reached from the internet. Your router uses NAT (many devices share one public address), and its firewall drops connections that start outside. The old fix was port forwarding: tell the router to send port 443 to your laptop. That needs router access, a public address your provider may not give you, and leaves your machine listening to the whole internet.
A tunnel turns the direction around:
- A client on your computer opens an outbound, encrypted connection to the tunnel service, usually on port 443, like any HTTPS request. Firewalls let that out.
- The service’s edge gives you a public hostname, with a real TLS certificate.
- When someone opens the address, the edge sends their request down the connection your client already opened. The client hands it to
localhost:3000and sends the answer back.
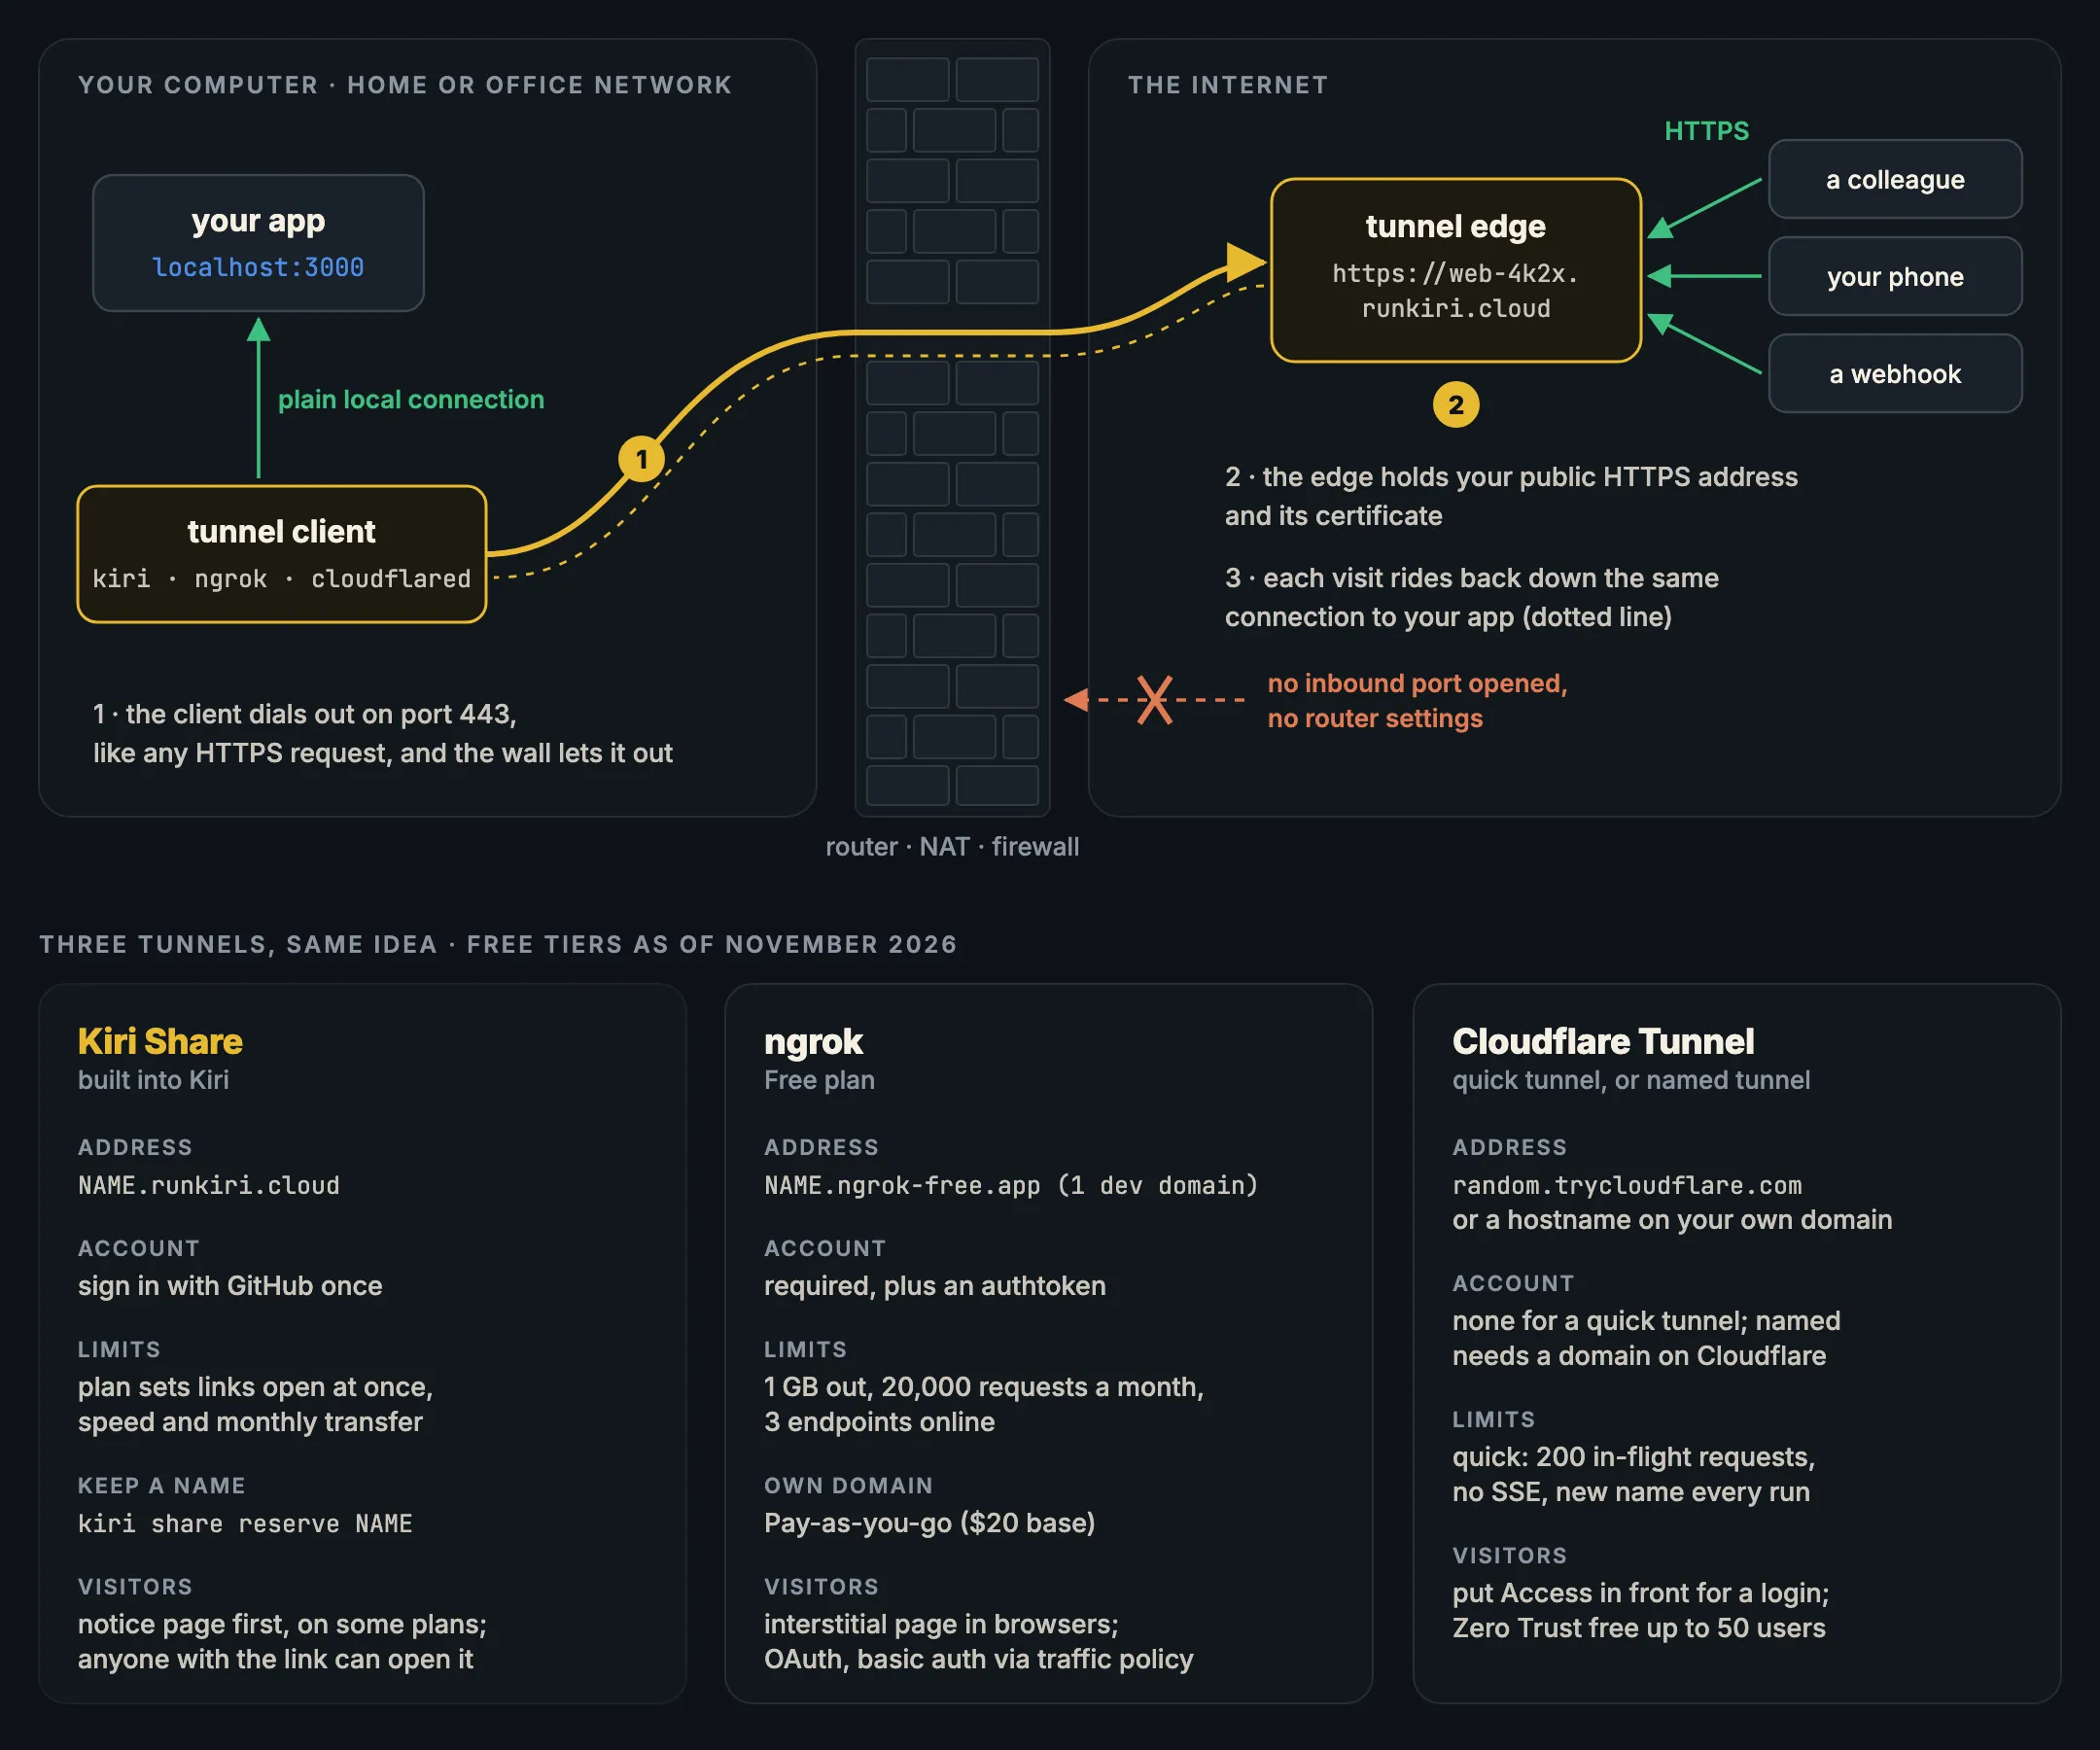
Nothing on your computer listens for the internet. The only open door is the one your client holds, and it closes when you stop the client.
ngrok
ngrok is the tool most people mean by “a tunnel”. You install the agent, add the token from your dashboard, and point it at a port (getting started):
brew install ngrok
ngrok config add-authtoken <token>
ngrok http 3000
Free plan (free plan limits, pricing): one automatically assigned dev domain such as your-name.ngrok-free.app, which stays the same across restarts; up to 3 endpoints online; 1 GB of data out, 20,000 HTTP requests and 5,000 TCP connections a month; 4,000 requests a minute. Free endpoints don’t time out. ngrok shows an interstitial page in front of HTML browser traffic on the free tier; API clients aren’t affected, and a request with the ngrok-skip-browser-warning header skips it.
Custom domains: the dev domain is the only one on the free plan. Hobbyist ($10 a month, or $8 a month billed yearly) includes 10 ngrok-branded domains. Bringing your own domain needs Pay-as-you-go ($20 base), at $0.01 per active hour per domain.
Auth: ngrok puts rules in front of your endpoint with a traffic policy file; the old --basic-auth and --oauth flags are deprecated in favour of it (agent CLI). Basic auth looks like this (basic-auth action):
# policy.yml
on_http_request:
  - actions:
      - type: basic-auth
        config:
          credentials:
            - "demo:a-long-password-here"
ngrok http 3000 --traffic-policy-file policy.ymlOAuth and OIDC logins count “traffic identities”: 3 monthly users on Free, 5 on Hobbyist. IP restrictions are a paid add-on.
Pick ngrok when you want the most features in one tool: a traffic inspector (24 hours of history on Free), TCP endpoints, a long list of traffic policy actions, and paid plans that grow into SSO and your own domains.
Cloudflare Tunnel
Cloudflare Tunnel runs a daemon, cloudflared, that keeps outbound-only connections to Cloudflare’s network; Cloudflare says it “does not use an inbound listener on your origin” (Cloudflare docs). It comes in two shapes.
Quick tunnels need no account and no domain (quick tunnels):
cloudflared tunnel --url http://localhost:3000You get a random trycloudflare.com address that changes every time. Cloudflare’s limits: quick tunnels are “for testing and development”, allow up to 200 in-flight requests (more get a 429), don’t support Server-Sent Events, and have no uptime guarantee.
Named tunnels publish a hostname on your own domain, such as app.example.com. The prerequisite is “a domain on Cloudflare”, which means its DNS is managed by Cloudflare (get started). You create the tunnel in the dashboard or API, then run it with its token:
sudo cloudflared service install <TUNNEL_TOKEN>Price: Tunnel is “available on all plans” (Cloudflare Tunnel), including the free one.
Auth: put Cloudflare Access in front, and every request needs a valid login from the identity providers you choose; Access is deny by default (self-hosted apps). Cloudflare’s Zero Trust Free plan is $0 for up to 50 users, then $7 per user a month (Zero Trust plans).
Pick Cloudflare Tunnel when your domain already lives on Cloudflare, or the tunnel should run for months. For a long-lived address on your own domain with a real login in front, it’s the best of the three.
Kiri Share
Kiri is a container runtime for Mac, Windows and Linux, and Kiri Share is built into it, so there’s nothing else to install. It gives a local port, a container or a Kubernetes service a public HTTPS address on runkiri.cloud (Kiri Share docs).
kiri share login      # once, with GitHub
kiri 3000             # same as: kiri share 3000
◆ Kiri Share connecting to edge.runkiri.com…
● linked localhost:3000
● live https://web-4k2x.runkiri.cloudHow it works: Kiri opens one encrypted connection to edge.runkiri.com on port 443, and each visit comes back down it as its own stream, so a slow visitor doesn’t hold up the rest. If your connection drops, Kiri reconnects by itself and keeps the same address. Every request prints a line with time, method, status, path, duration and size, which is handy for watching a webhook land.
Containers and Kubernetes: this is where it differs from the other two. Every running container in Kiri’s window has a Share button, and kiri share web shares a container by name using its lowest published port. Pods and services in Kiri’s Kubernetes view have a Share column too; Kiri forwards to the service, with no kubectl port-forward to run. On Windows, kiri share takes a port, and containers are shared from the window.
Names: without a name, the edge picks one. kiri 3000 demo asks for demo.runkiri.cloud, and kiri share reserve demo keeps it for you across restarts. Addresses are under runkiri.cloud; the docs don’t offer your own domain.
Limits and price: your Kiri Cloud plan sets how many links can be open at once across your computers, a speed limit and a monthly transfer allowance. kiri share status shows yours; when the allowance runs out, links stop until next month. On some plans, visitors see a short Kiri Cloud notice page before your app, so a link can’t pass itself off as someone else’s site.
Auth: the docs don’t describe a login gate. Anyone with the address can open it, so anything private needs its own login in your app. You can Pause a link so nobody can open it until you resume, or Disconnect it.
Pick Kiri Share when you already run your app in containers on Kiri, or want to share a Kubernetes service without an ingress. It saves installing and signing in to a second tool. If you need a password in front or your own domain, use ngrok or Cloudflare.
Which one should you use? Picking an ngrok alternative
- A quick demo or webhook test, no account: a Cloudflare quick tunnel. Expect a new address every run.
- A stable free address and a request log: ngrok’s dev domain or a reserved Kiri Share name. ngrok’s free tier is capped at 1 GB and 20,000 requests a month.
- A container or Kubernetes service on your laptop: Kiri Share, one click per container.
- Your own domain with a login in front: a Cloudflare named tunnel with Access, or ngrok Pay-as-you-go with a traffic policy.
What you’re actually exposing
A tunnel makes your local app as public as a deployed one, often with less care taken over it. Before you send the link:
- The address is the only lock. Without basic auth, OAuth or Access in front, anyone who gets the URL can use the app. Links get pasted into chats, tickets and screenshots.
- Dev servers aren’t hardened. Debug pages, stack traces,
/adminroutes, source maps and hot-reload endpoints all come with it. So does an API that trusts every request because “it’s only local”. - It’s your data. A local app often talks to a real database, cloud keys in
.env, or your logged-in browser cookies through the same host name. Anything the app can reach, a visitor can try to reach through it. - Share one port, not a proxy. Pointing a tunnel at a reverse proxy or a router admin page exposes everything behind it.
- Watch the request log. All three tools show requests as they arrive. Automated scanners probe public hostnames; unfamiliar paths like
/.envor/wp-login.phpmean you’re being scanned. - Stop it when you’re done. Press Ctrl+C, disconnect the link, or let it run only as long as the demo. Kiri’s docs put it simply: “A shared address is public. Share only what you’d show anyone.”
If you work with AI coding agents, the same thinking applies to what they can reach: see What your AI agent can reach.
Related
Running your app in containers without Docker Desktop? Compose on a Mac without Docker Desktop and Docker Desktop alternatives compared cover the runtime side, and Kiri vs Docker Desktop explains what changes. Kiri is on the download page for Mac, Windows and Linux.
In short
- A tunnel client dials out on port 443; the edge gives you an HTTPS address and sends visits back down that connection. No router changes, nothing listening for the internet.
- ngrok: free dev domain, 1 GB and 20,000 requests a month, a browser interstitial; own domains from Pay-as-you-go ($20 base); basic auth and OAuth through traffic policy.
- Cloudflare Tunnel: free; quick tunnels need no account but change name every run and cap at 200 in-flight requests; named tunnels need your domain on Cloudflare and pair with Access for logins.
- Kiri Share: built into Kiri; shares ports, containers and Kubernetes services at
runkiri.cloudnames you can reserve; plan limits on links, speed and transfer; no login gate, so protect private apps yourself. - Whatever you use, the link is public: add auth, don’t expose debug tools or real data, and stop sharing when you’re done.